How to Build a Slack Bot for Reporting Standups
by Pharis
After joining Ona as a Software Engineering Intern, I was tasked to compile and post standups for all the members of the project we were working on. At first it was a great experience, and even better we could alternate shifts with another intern. However, as time went by the task was too repetitive and had lots of back and forth reminding team members to send their standups. I met another colleague from another team who had the same issue and had thought of building a bot that would compile standups for various teams and individuals. After some hours of reading and re-reading the Slack API documentation we realized we could make the idea a reality. We decided to build a Slack app using Node.js. This would save us from doing mundane compiling tasks and create a better experience for everyone involved… a.k.a laziness for the win :p. Since the app is pretty huge I will split the tutorial into various posts.
In this tutorial, we’ll be building a Slack app called autostandup that provides functionality to submit standups. Our app will allow users to submit their standups by invoking a slash command on Slack, which will fire up a dialog/form to submit their standups and send a confirmation message to the user once the standup is persisted to the database.
Prerequisites
Before getting started you will need to have node installed on your machine. This is ridiculously easy. You’ll also need to have basic knowledge of the Express web framework as well as ngrok or any other secure tunneling service to make your localhost publicly reachable.
Creating the Slack App
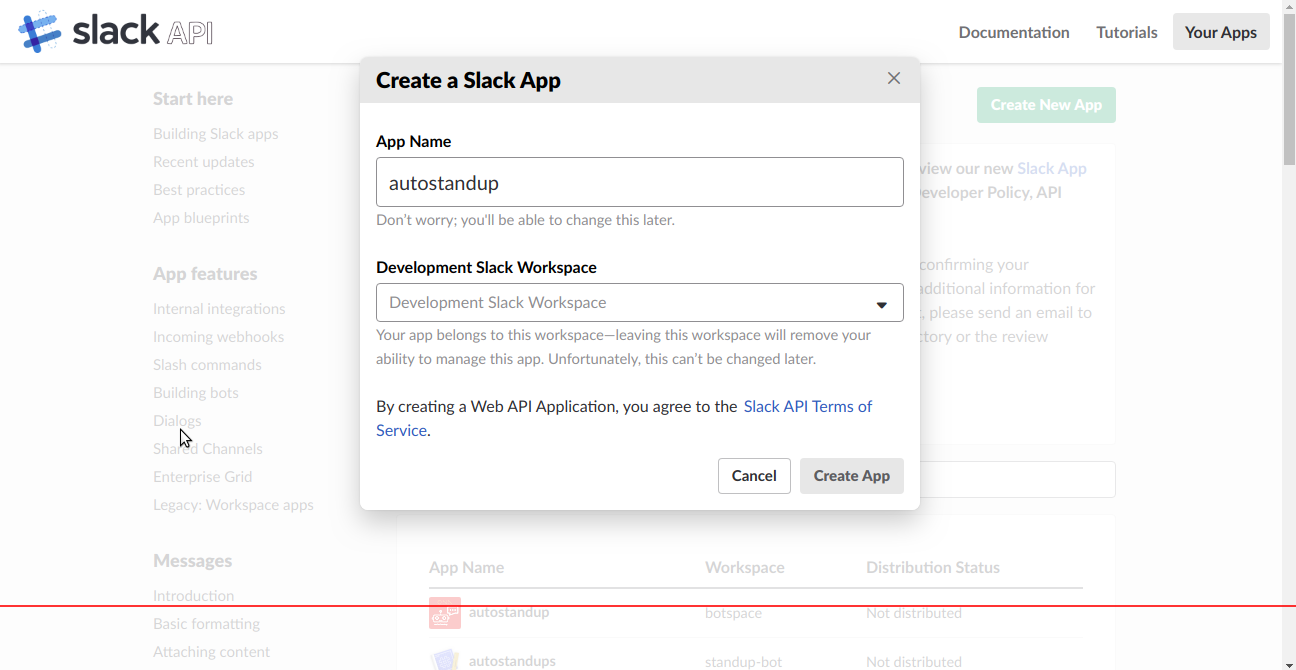
Our bot will be packaged as a Slack app. Slack apps allow you to add more functionality into your Slack workspace. In our case, we’ll be adding our custom stand up functionality. To create your new Slack app, go to this page and set your app name as well as the workspace you’ll be developing your app in. If you don’t have a workspace, you can create one here.
Enable Slack App Features
Next we’ll need to configure our new slack app with the features we’ll be using to achieve our needed functionality. For our auto-standup bot to work, we’ll need to enable the following features:
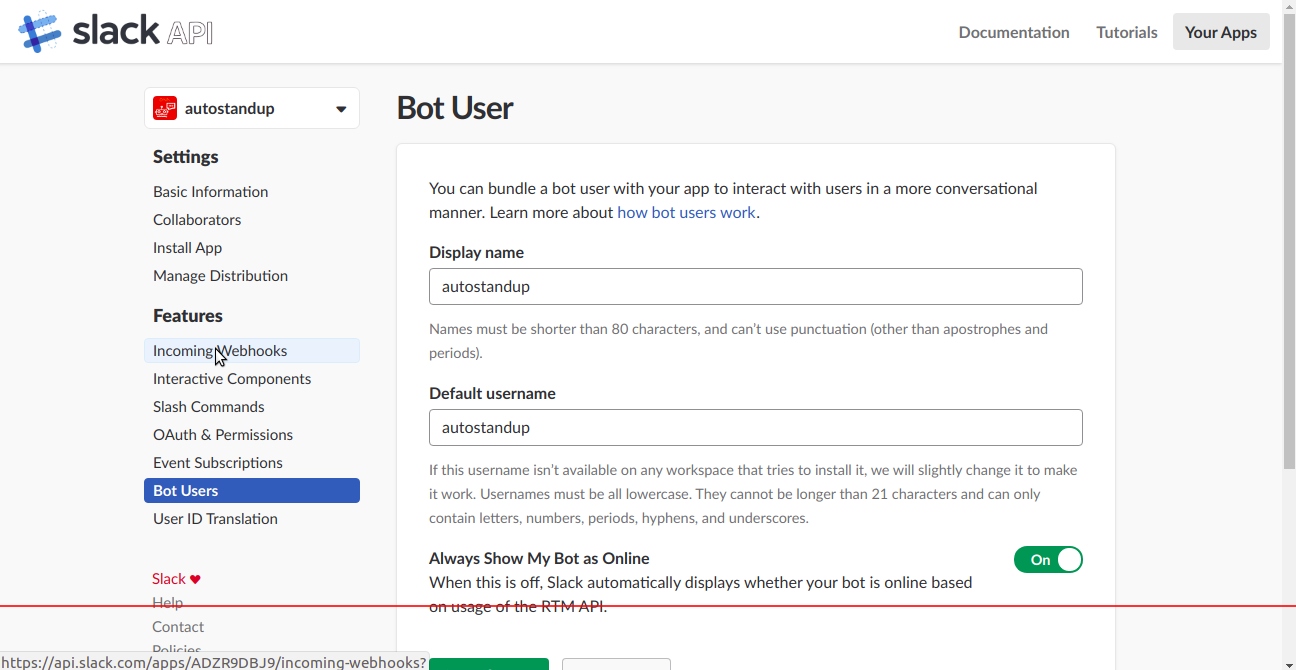
Bot Users – This will enable our app to interact with users in a more conversational manner
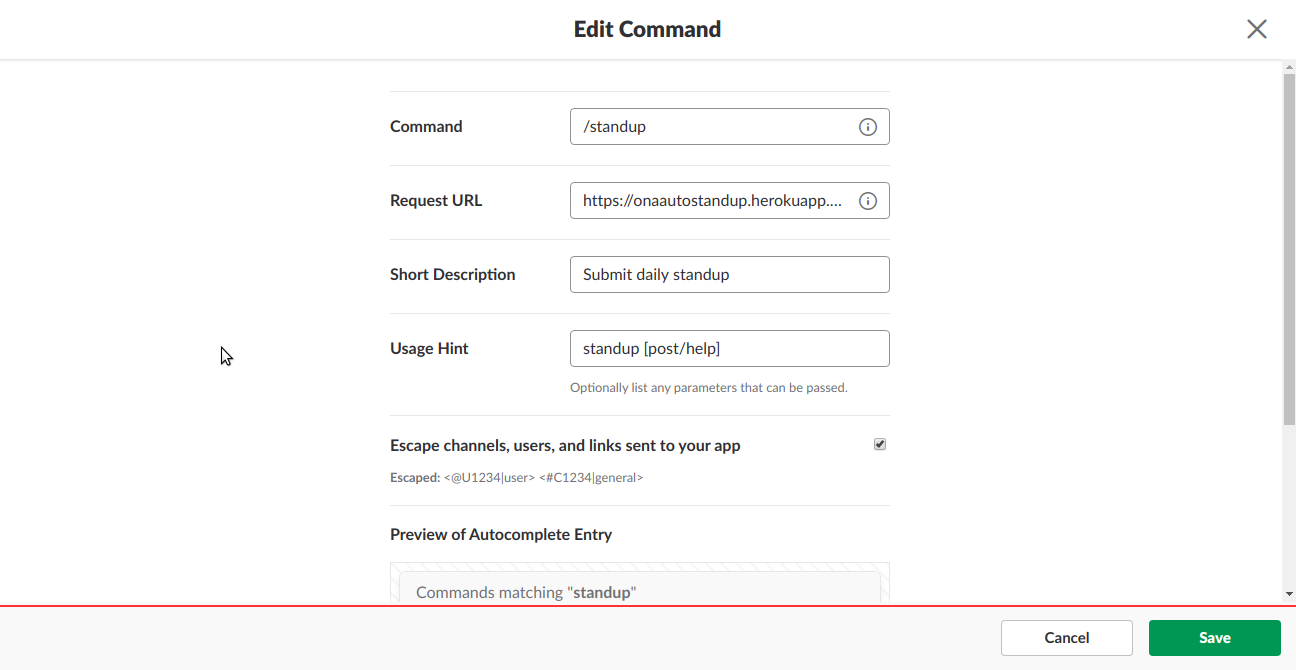
Slash Commands – This will allow users to invoke app methods that we expose. We’ll use this to allow the user to initiate a dialog for the standup.
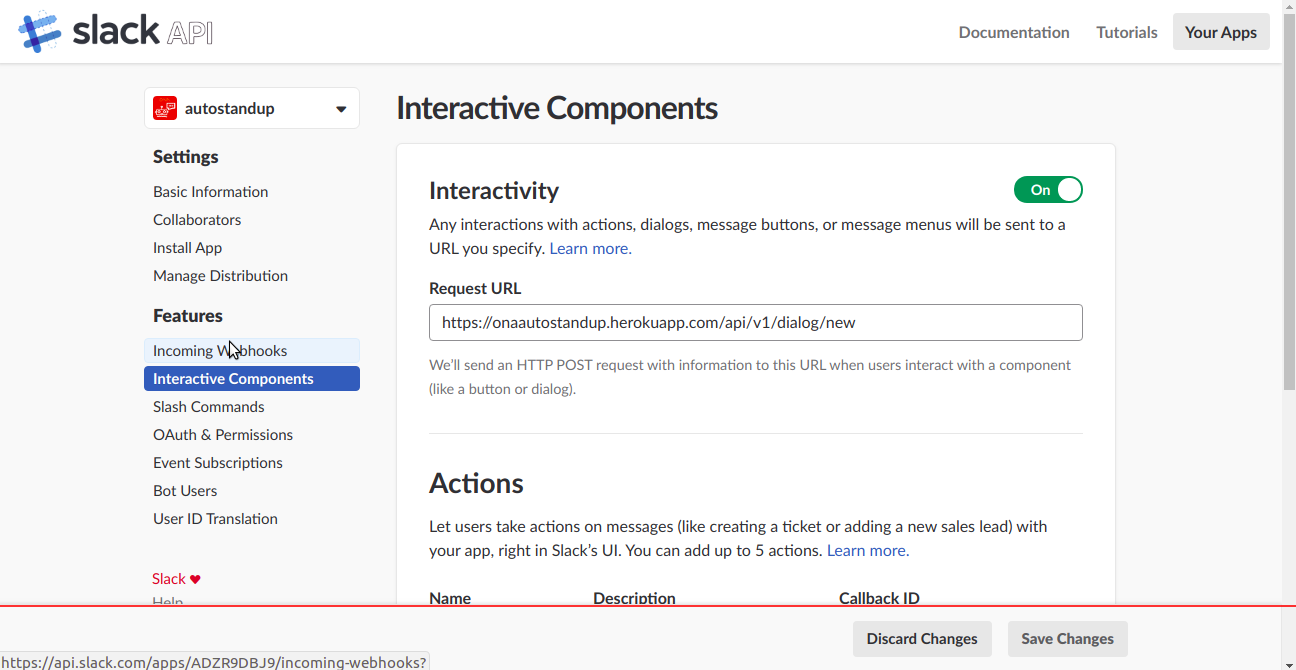
Interactive Components – Any interactions with actions, dialogs, message buttons, or message menus will be sent to a URL you specify here.
To enable bot users, click on the “Bots” feature button as shown in the image above. Set your bots Display Name and Default Username to auto standup or whatever name you find fitting.
For slash commands and interactive components to work, our app will need to provide webhooks that Slack can post to. These features involve actions that are initiated by the user inside Slack. Every time an action happens through a slash command or interactive component, Slack will make a POST request to our registered webhook and our application will need to respond accordingly. To enable slash commands, click on the Slash Commands feature button as shown in the image above. We’ll create a new slash command called /standup and set the webhook to our server side endpoint that will handle this action:
https://[your-ngrok-domain-here]/api/v1/slashcmd/new
Whenever a user sends a message beginning with /standup, Slack will make a POST request to the configured webhook and our app will initiate a dialogue. Once we have the dialogue, we need to figure what endpoint will handle posting the submitted data and that’s where interactive components comes in. To enable interactive components, click on the Interactive Components feature button as shown in the image above and set the webhook to our server side endpoint that will handle this action:
https://[your-ngrok-domain-here]/api/v1/dialog/new
Once the dialogue is submitted we hit the .../dialog/new endpoint persisting the standup details in our database and sending confirmation to the user.
Install Slack App to Workspace
Installing the Slack app directly into the workspace being used by your organization isn’t a great idea since a lot of testing is involved which may be disturbing to users. Creating a new workspace for testing is desirable and pretty much straight forward. This will make the app available to the users in the workspace plus generate all the necessary tokens our application will need to make authenticated requests to Slack’s API.
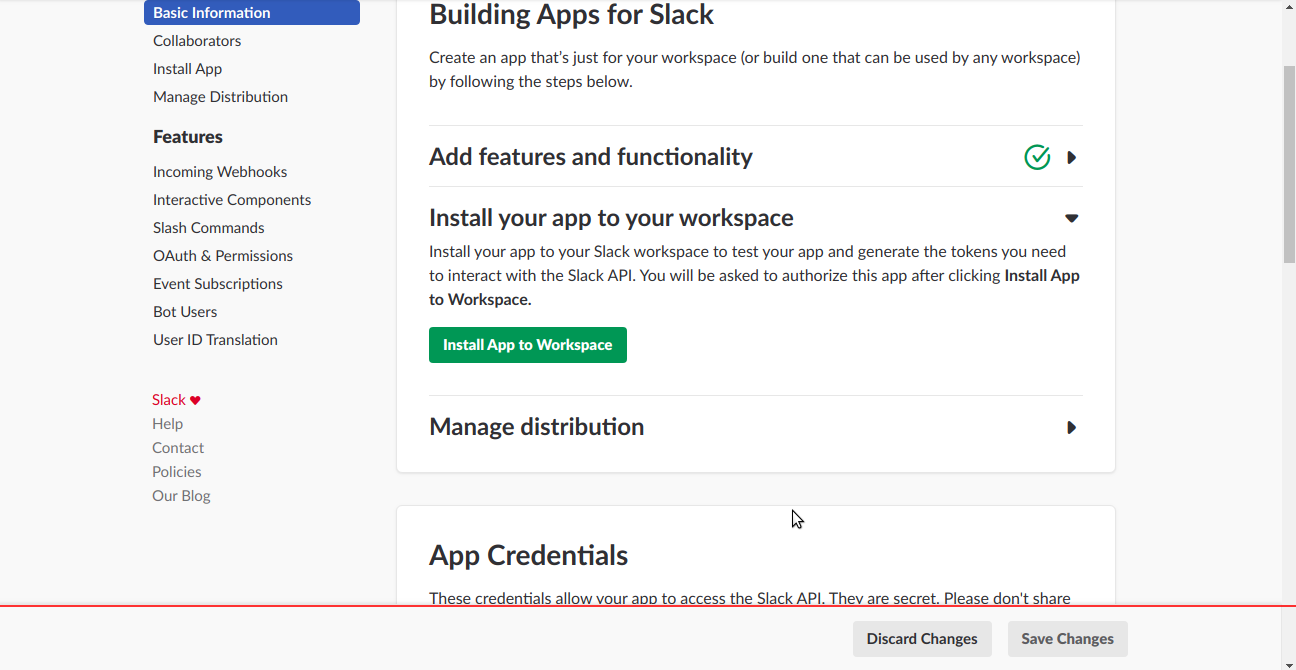
After installing the app to your workspace, click the OAuth & Permissions menu item available to the right of the screen to get the authentication tokens we’ll be using. Our application will only be making use of the Bot User OAuth Access Token, copy it and save it privately.
Setup Node Application
Great! Now that our Slack app is successfully configured and installed, we can begin working on the Node.js application. Let’s begin by recapping what the scope of our Node.js application will be. It will need to:
- Process
POSTrequests from Slack as a result of our users sending the/standupslash command. - Persist submitted data.
- Send a confirmation message to the user.
Enough mambo jambo! Let’s look at some code. Open your terminal and create a new folder called autostandup or whatever name you find fitting. Navigate into the folder and initialize the project by running npm init. This will give you a few prompts, no need to answer all of them, just keep pressing enter to use the default values.
Installing packages
npm i @slack/client – Installs the web Slack API that exposes API methods.
npm i bluebird – Bluebird is a fully featured promise library with a focus on innovative features and performance.
npm i body-parser – Node.js body parsing middleware.
npm i dotenv – Dotenv is a zero-dependency module that loads environment variables from a .env file into process.env.
npm i cors – Package for providing a Connect/Express middleware that can be used to enable CORS with various options.
npm i express – Web framework for node.
npm i moment – A lightweight JavaScript date library for parsing, validating, manipulating, and formatting dates.
npm i promise – This is a simple implementation of Promises. It is a superset of ES6 Promises designed to have readable, performant code and to provide just the extensions that are absolutely necessary for using promises today.
npm i @slack/client – This package is aimed at making building Slack apps ridiculously easy. It helps you build on all aspects of the Slack platform, from dropping notifications in channels to fully interactive bots.
npm i sqlite3 – Asynchronous, non-blocking SQLite3 bindings for Node.js.
npm i tsscmp – Prevents timing attacks using Brad Hill’s Double HMAC pattern to perform secure string comparison.
Now that you’ve installed all the necessary packages, let’s keep going. We should create a src folder inside our root folder i.e auto_standups for my case. Inside the src folder create an index.js file. And place the below code into the index.js file.
if (process.env.NODE_ENV !== 'production') {
    const dotenv = require('dotenv')  //Configure environmental variables
    const result = dotenv.config()

    if (result.error) {
        throw result.error
    }
}

const express = require("express")
const bodyParser = require("body-parser")
const cors = require("cors")
const SlashCommandRouter = require("./api_routes/slash-command-route.js")
const DialogRouter = require("./api_routes/dialog-route.js")
const AppBootstrap = require(".main.js")
const debug = require("debug")("onaautostandup:index")

// Initialize app and attach middleware
console.log('app-bootstrap', AppBootstrap);
const app = express()

const rawBodyBuffer = (req, res, buf, encoding) => {
    if (buf && buf.length) {
        req.rawBody = buf.toString(encoding || 'utf8');
    }
};

app.use(cors())
app.use(bodyParser.urlencoded({ verify: rawBodyBuffer, extended: true }))
app.use(bodyParser.json({ verify: rawBodyBuffer }))

// Error handling middleware
app.use(function (err, req, res, next) {
    console.log(err.stack)
    res.status(500).send({ error: err.message })
    debug("App Error description: " + err)
})

app.use("/api/v1", SlashCommandRouter)
app.use("/api/v1", DialogRouter)
app.get('/', (req, res) => {
    res.send('<h2>AutoStandup app is up and running</h2> <p>Login to your' +
             ' slack account and start submitting standups.</p>');
});

AppBootstrap.main()

app.listen(process.env.PORT || 7777, function () {
    console.log("[+] app listening for requests")
})
We also need to set where our app will start inside the scripts map in a package.json file.
"scripts": {
    "start": "DEBUG=autostandup node src/index.js"
},
We will proceed by setting up our sqlite database. We need to download DB Browser for sqlite.
Inside the src folder create a folder and name it repositories. Then create a file and name it user-standups-repo.js and paste in the following code.
class UserStandup {
    constructor(dao) {
        this.dao = dao
    }

    createTable() {
        const sql = `
            CREATE TABLE IF NOT EXISTS user_standups(
                id INTEGER PRIMARY KEY AUTOINCREMENT,
                username TEXT NOT NULL,
                standup_today TEXT  NOT NULL,
                team TEXT NULL,
                standup_previous TEXT NULL,
                date_posted TEXT NOT NULL
            )
        `
        return this.dao.run(sql)
    }

    add(userStandup) {
        console.log('inside add =====>', userStandup)

        const { username, standup_today, team, standup_previous, date_posted } = userStandup
        const insertStatement = `INSERT INTO user_standups (username,standup_today,team,standup_previous,date_posted)
        VALUES (?,?,?,?,?)`
        console.log('insert statement', insertStatement);
        console.log('query', this.dao.run(insertStatement, [username, standup_today, team, standup_previous, date_posted]))
    }
}

module.exports = UserStandup
Create .env in the root folder, auto_standups, to store all of our environment variables. .env should contain the following:
APP_NAME = 'autostandups'
NODE_ENV = 'production'
SLACK_ACCESS_TOKEN = 'your Bot User OAuth Access Token'
SLACK_SIGNING_SECRET = 'your Signing Secret'
DB_PATH = ./db.sqlite3
I will make a main.js file along with a dao.js (or Data Access Object) file inside the src folder. We will scaffold out a data access class called AppDAO that will establish a connection to the database inside a constructor. Inside the dao.js file paste in this code.
const sqlite3 = require("sqlite3")
const Promise = require("bluebird")

class AppDao {
    constructor(dbFilePath) {
        this.db = new sqlite3.Database(dbFilePath, (err) => {
            if (err) {
                console.log("Database connection failed!")
                console.error(err.stack)
            } else {
                console.log("Database connection successful!")
            }
        })
    }

    run(sql, params = []) {
        return new Promise((resolve, reject) => {
            this.db.run(sql, params, function (err) {
                if (err) {
                    console.log("[!DDL operation] Error running sql => [" + sql + "]")
                    console.log(err)
                    reject(err)
                } else {
                    resolve({ id: this.lastID })
                }
            })
        })
    }

    get(sql, params = []) {
        return new Promise((resolve, reject) => {
            this.db.get(sql, params, (err, result) => {
                if (err) {
                    console.log("[!Select One]Error running the sql => [" + sql + "] ")
                    console.log(err)
                    reject(err)
                } else {
                    resolve(result)
                }
            })
        })
    }

    all(sql, params = []) {
        return new Promise((resolve, reject) => {
            this.db.all(sql, params, (err, rows) => {
                if (err) {
                    console.log("[!Select All]Error running the sql => [" + sql + "] ")
                    console.log(err)
                    reject(err)
                } else {
                    resolve(rows)
                }
            })
        })
    }
}

module.exports = AppDao
In the main.js file we will run userStandup queries, which is in the repositories folder, to set up our table. Add the code below to the main.js file
const AppDao = require("./dao")
const UserStandupsRepository = require("./repositories/user-standups-repo")

const dao = new AppDao(process.env.DB_PATH)
const userStandupRepo = new UserStandupsRepository(dao)

function main() {
    initDb()
}

function initDb() {
    // Create tables
    userStandupRepo.createTable().catch((err) => {
        console.log('Error: ')
        console.log(JSON.stringify(err))
    })
}

module.exports =  { main, userStandupRepo }
The other bit includes initializing a dialogue once the /standup slash command is invoked. Inside src we will create a folder api_routes which will contain two files that handle POST requests once the slash command is fired and once the dialogue is submitted. Name the first file slash-command-route.js and name the second file dialog-route.js. In order to fire-up the dialogue we need to verify Slack’s signature. For this reason we will create a verify-signature.js file inside the src folder and paste the following code.
const crypto = require('crypto');
const timingSafeCompare = require('tsscmp');

const isVerified = (req) => {
    const signature = req.headers['x-slack-signature'];
    const timestamp = req.headers['x-slack-request-timestamp'];
    const hmac = crypto.createHmac('sha256', process.env.SLACK_SIGNING_SECRET);
    const [version, hash] = signature.split('=');

    // Check if the timestamp is too old
    const fiveMinutesAgo = ~~(Date.now() / 1000) - (60 * 5);
    if (timestamp < fiveMinutesAgo) return false;

    hmac.update(`${version}:${timestamp}:${req.rawBody}`);

    // Check that the request signature matches expected value
    return timingSafeCompare(hmac.digest('hex'), hash);
};

module.exports = { isVerified };
Here we check wether the timestamp is too old and if the request signature matches the expected value. Now back to our api_routes folder, inside slash-command-route.js we will verify the signature before we open the dialogue. Add this code to slash-command-route.js.
if (process.env.NODE_ENV !== "production") {
    const dotenv = require("dotenv");  // Configure environmental variables
    const result = dotenv.config();

    if (result.error) {
        throw result.error;
    }
}

const express = require("express");
const SlashCommandRouter = express.Router();
const debug = require("debug")("onaautostandup:slash-command-route");
const signature = require("../verify-signature");
const moment = require("moment");
const token = process.env.SLACK_ACCESS_TOKEN;
const { WebClient, ErrorCode } = require("@slack/client");
const web = new WebClient(token);

/* Express route to handle post request when the slash command is invoked by the
 * users of the app
 */
SlashCommandRouter.post("/slashcmd/new", function (req, res) {
    let {user_id, trigger_id } = req.body;
    if (signature.isVerified(req)) {
        const dialog = {
            title: "Submit standup update",
            callback_id: "submit-standup",
            submit_label: "Submit",
            state: moment().format("YYYY-MM-DD"),
            elements: [
                {
                    label: "Post as",
                    type: "select",
                    name: "team",
                    options: [
                        { label: "Team A", value: "Team A" },
                        { label: "Team B", value: "Team B" },
                        { label: "Team C", value: "Team C" },
                        { label: "Team D", value: "Team D" },
                    ],
                    hint:
                    "You can post individual standup or as team. Team standups will be group together",
                },
                {
                    label: "Today's update",
                    type: "textarea",
                    name: "standup_today",
                    optional: false,
                    placeholder: "e.g - Add unit tests to Kaznet's playbook"
                },
                {
                    label: "Previously/Yesterday",
                    type: "textarea",
                    name: "standup_previous",
                    optional: true,
                    placeholder: "e.g - Deployed OpenMRS and OpenSRP servers"
                }
            ]
        };

        openDialog(trigger_id, dialog).then(result => {
            if (result.ok === true) {
                res.status(200).send("");
            } else {
                res.status(500).end();
            }
        });
    } else {
        debug("Verification token mismatch");
        res.status(404).end();
    }
});

function openDialog(triggerId, dialog) {
    return web.dialog
    .open({ trigger_id: triggerId, dialog: JSON.stringify(dialog) })
    .then(res => {
        console.log("Open dialog res: %o ", res);
        return Promise.resolve(res);
    })
    .catch(error => {
        if (error.code === ErrorCode.PlatformError) {
            console.log(error.message);
            console.log(error.data);
        } else {
            console.error;
        }
        return Promise.reject(error);
    });
}

module.exports = SlashCommandRouter;
With everything as is, the problem is that after we submit the dialogue nothing happens. To fix this we need to add the dialogue route functionality, which handles submission of the dialogue. Inside our dialogue-route.js add the following code.
if (process.env.NODE_ENV !== "production") {
    const dotenv = require("dotenv");  // Configure environmental variables
    const result = dotenv.config();

    if (result.error) {
        throw result.error;
    }
}

const express = require("express")
const DialogRouter = express.Router()
const signature = require("../verify-signature")
const AppBootstrap = require("../main");
const token = process.env.SLACK_ACCESS_TOKEN;

const { RTMClient, WebClient, ErrorCode } = require("@slack/client");
const rtm = new RTMClient(token);
const web = new WebClient(token);
rtm.start();

const botResponse = new Array("Got it! Thanks", "Awesome!",
    "Cool. Will get it posted.", "Great!", "Thank you!", "Thanks!", "You are awesome", "Yes!",
    "Just doing my job", "Okay!", "Alright!","Nice, thanks")

function pickRandomResponse() {
    var pos = Math.floor(Math.random() * (botResponse.length - 0) + 0)
    return botResponse[pos]
}

function sendConfirmation(userId) {
    console.log(userId)
    sendMessageToUser(userId, pickRandomResponse())
}

// Handle post request from slack
DialogRouter.post('/dialog/new', function (req, res, next) {
    console.log('Enter POST /dialog/new');
    const body = JSON.parse(req.body.payload)
    console.log('body', body)

    if (signature.isVerified(req)) {
        console.log('passes signature')
        let standupDetails = {
            username: body.user.id,
            standup_today: body.submission.standup_today,
            team: body.submission.team,
            standup_previous: body.submission.standup_previous,
            date_posted: body.state
        }

        saveStandup(standupDetails)
        sendConfirmation(body.user.id)
    } else {
        console.log("Token Mismatch!")
        res.status(404).end()
    }
})

function sendMessageToUser(userId, message) {
    console.log('message', message)
    web.conversations
    .list({ exclude_archived: true, types: "im" })
    .then(res => {
        const foundUser = res.channels.find(u => u.user === userId);

        if (foundUser) {
            rtm
            .sendMessage(message, foundUser.id)
            .then(msg =>
                console.log(
                    `Message sent to user ${foundUser.user} with ts:${msg.ts}`
                )
            )
            .catch(console.error);
        } else {
            console.log("User doesn’t exist or is the bot user!");
        }
    });
}

function saveStandup(standupDetails) {
    AppBootstrap.userStandupRepo.add(standupDetails);
}

module.exports = DialogRouter
Run it
Time to run our bot! On your terminal inside your autostandup folder run the command npm start and confirm your database connection is running fine and your server is up and running. Use ngrok to make your localhost publicly reachable by running ngrok http 7777.
Go to API Slack apps and choose your app. Set the url, e.g. http://369f6980.ngrok.io on Interactive Components and the slash command request url option. Now re-install the app and head to your workspace to confirm it’s working.
Fire up the slash command /standup, fill in the dialog, and submit your standup. Now check if you received a message from autostandup thanking you for posting your standup and check that your sqlite browser db persisted a new record.
Conclusion
Slack can be used for all types of interesting tasks, and standups is one of them. Slack has great documentation so make sure to dig through it to see all the interesting features available to you. Hopefully this tutorial has taught you a thing or two about building Slack applications and Node.js development in general. If you have any improvements / thoughts please drop me a comment.
Cheers!